Here By Popular Demand.... DIY How To's!
I've had a number of people ask me how I did several projects so I decided to make an entire page with those how to instructions!
*With each project I have given due credit to the source unless the project was all Brandy-fied (:
*With each project I have given due credit to the source unless the project was all Brandy-fied (:
Pew Cones
Materials Needed:
8.5" x 11.5" paper (regular printer size)
glue
tape
reg. hole punch
12" of 1/4" ribbon
Starting at the bottom right corner (can do left too I'm just left handed so right is easier for me) and begin to roll the corner trying to follow the edge.
This will begin your cone shape.
Continue rolling until you have rolled the entire sheet into the cone.
The outside flap should fall directly behind the back part of the cone.
Once rolled take 2 pieces of tape and secure the paper on the inside of the cone.
After it has been secured take a small amount of glue and glue the outside flap. Let dry.
Once the glue has dried we are ready to create the holes for the ribbon.
Starting 1/2" from the center on either side make a hole using the hole punch.
From those holes 1" out punch another hole and repeat two more times.
Now thread the ribbon through the holes. The ribbon should come out of the last set of holes allowing you to tie them to the pew!
** TIP: if filling them with fresh flowers... cut a ziplock sandwich baggie to fit inside the cone and secure with tape. This way the water won't leak through the paper!
Bridesmaid's Pearl NeckLaces
All from the BirdCage Bride Blog.
Instructions can be found here http://www.feathersnpearls.com/2009/01/diy-pearl-necklaces.html
Instructions can be found here http://www.feathersnpearls.com/2009/01/diy-pearl-necklaces.html
Bridesmaid's Pearl Bracelets
Materials Needed:
beading wire
8mm glass pearl beads (20-25 per bracelet)
crimp beads
10mm jump rings
toggle clasps
scissors
needle nose pliers
Cut a length of beading wire (I used my own wrist to measure just make sure you give yourself plenty to work with) and thread on one crimp bead and smallest part of the toggle clasp. (Makes it easier to work with)
Thread the wire back down through the crimp bead (as to loop the part of the clasp) and pull until the clasp is secure.
Take the pliers and clamp the bead to hold the wire in place. Cut the extra wire off the end.
Now begin stringing your beads.
Once you have the desired number of beads thread on another crimp bead and the other half of the toggle clasp. Repeat the same steps as with the beginning.
Ta-da! Matching bracelet (:
Bridal Haute Bracelet
Materials Needed:
beading wire
8mm glass pearl beads
6mm glass pearl beads
crimp beads
crimp covers
scissors
needle nose pliers
3 strand clasp
Swarovski center component
Cut a length of wire of about 6 inches or more. ( I used my wrist to measure - from the centerpiece to where the clasp would be)
Thread on one crimp bead and then thread through an opening in the centerpiece then back through the crimp bead. Make sure you are centering it on the centerpiece. You will be starting with the middle row and working out on either side.
Once you pull the beading wire tight. Take the pliers and secure the crimp bead. Trim off any extra wire other than what you will be stringing the beads onto.
Cover the crimp bead with the crimp cover.
Begin threading on the beads. Use just enough to reach from the centerpiece to the clasp and make sure to give yourself plenty of room to be able to secure the clasp as well once you have finished. Mine required about 8 of the 8mm pearls.
Once you have strung enough beads. Thread on one crimp bead and string the beading wire through the middle hole of the 3 hole clasp. Then back through the crimp bead. Secure. Then cover with a crimp cover.
Repeat the process only moving the strings one spot over on the centerpiece and on the opposite holes on the clasp.
The process for the outer beads is still the same only you will use a few more beads since the outer edges are 6mm. And when attaching to the clasp, attach them to the outmost portion of the 2 end holes of the clasp.
*Side note. To complete this make sure you have a couple hours on your hands and a good tv show or movie to occupy you. (:
Mine took me 2 attempts because I was rushing through it.
Fascinator
Materials Needed:
feathers (as many as you want)
2 flowers
small square of cardstock
alligator clip
scissors
hot glue gun
Begin by taking the feathers (as many as you want to get your desired look.) I used about 8 personally.
And being arranging them in a fan like pattern.
Then place the flowers on the feathers (you might have to try a few positions for them) until you arrive at your desired look.
Pre-arranging them allows you to achieve the look you want before gluing anything in place and wasting materials (:
Now take the small square of cardstock (my piece was about 1in x 1in) and use the hot glue gun to place a small dot of glue in the middle.
Begin taking the feathers and arranging them in the same pattern as you had arranged them in before onto the square making sure each is glued on as you go.
Once the feathers are securely fastened, take the flowers and glue them in the desired position.
Now take the entire square (trimming down any corners or extra cardstock) and glue it to the top of the alligator clip.
Let the entire piece dry for a bit.
Presto! Fancy Hair Do-Dad!
"Something Blue" Fancy Panties
The instructions I used were in this fellow knotties blog: http://soon2bmrsk.blogspot.com/2009/12/diy-iron-on-tutorial.html which was a life saver since I could not find directions anywhere else! However I do have a few tips to save some time and paper :)
1. You can also use http://shop.hobbylobby.com/products/fabric-stick-sheets-693432/ instead of mylar. I went to 2 of my local hobby lobbys and they didn't carry the mylar so at the last stop I just stopped and started talking to one of the ladies that worked there and she recommended I try this as she had used it before for a similar project. It worked perfectly.
2. To save a little time trying to figure out text size. I used around 4 sheets of paper with multiple sizes on each before figuring out that it just needed to be big enough to fit on one line reaching each side on a word document. This is somewhere between the 48 & 72. I just typed what I wanted into WordArt and adjusted til I got it the perfect size.
3. I know the instructions on the back of the hot fix packets say this but DO NOT move the iron only press down. I misplaced a gem by barely twitching. This project does require Jedi-like concentration.
4. Also when printing your image. To make it print backwards... Go to print. Click on properties. Then click on the page layout tab. Under more options click the Mirror Image box.
Good luck on your sparkly creations!
Hat Box Card Box
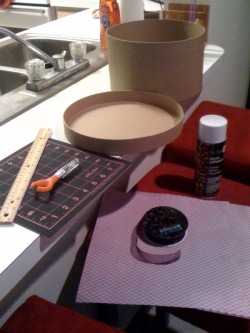
Materials Needed:
paper mache round hat box
5-8 pieces of 12x12 cardstock (to allow for mis-cuts and mistakes)
craft knife
cutting mat
ruler
spray adhesive
scissors
7/8' ribbon
rhinestone buckle (optional)
paper mache round hat box
5-8 pieces of 12x12 cardstock (to allow for mis-cuts and mistakes)
craft knife
cutting mat
ruler
spray adhesive
scissors
7/8' ribbon
rhinestone buckle (optional)
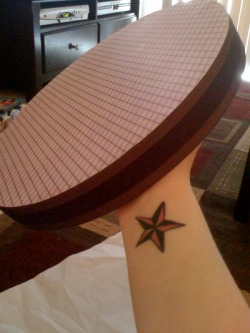
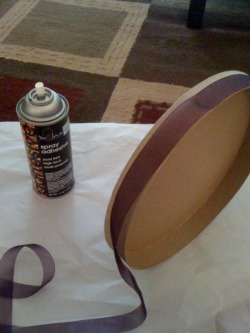
The first thing I did was cover the lid. To do this I coated the top part of the lid with spray adhesive and placed a whole sheet of scrapbook paper on top.
After letting it dry for a couple minutes I placed it onto my cutting mat and took my craft knife and went around the edges of the lid trimming the paper to fit.
Then I moved onto the bottom part.
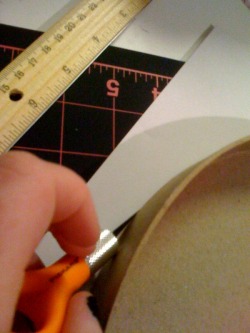
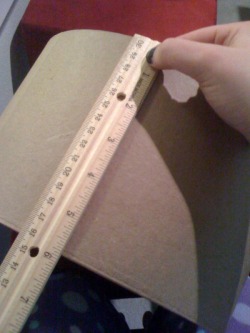
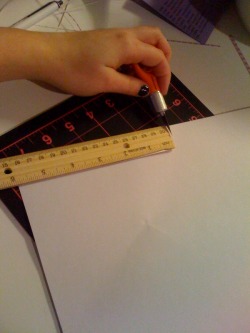
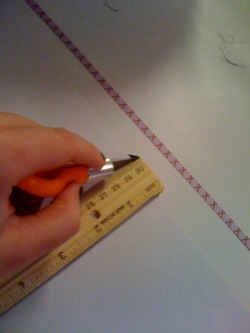
I first measured the height, then used that measurement to mark the height on my scrapbook paper using the craft knife. Do this for both sides of the paper.
Line the ruler up with both marks you made and pressing the craft knife up against the ruler, drag it down the paper.
Take the strip you just cut and hold it up against the bottom to make sure your measurements are right and do not need to be altered.
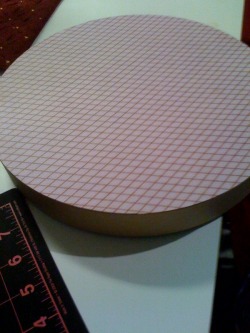
My bottom portion took 3 strips of paper to cover it completely.
Now take the spray adhesive and spray a section of the box as well as the paper you are applying to it.
To get my paper as even as I could I set the box on my kitchen counter after spraying it and touching the paper to the counter as I adhered it to the box.
Once the paper is adhered to the box sit the box on its side and make sure to get all of the bubbles out before it dries.
Repeat for all strips adhered to the box.
Once I had all my strips of paper on and the box was covered I turned it up on its side and made sure to trim any access paper with the craft knife that was sticking up over the edge.
Now to finish the lid. I still had the edge to cover so I used the spray adhesive to coat sections as I went along and wrapped the ribbon along the edges.
Once I completed the lid I moved back to the box to add the final embellishments. I wrapped a length of ribbon around the center and secured it with spray adhesive after centering the rhinestone buckle in the center.
Let everything dry and you are finished!
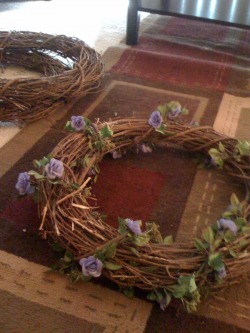
Wreaths
Materials Needed:
18" grapevine wreath
6' garland
3 flower heads
1/8" ribbon
floral wire
wire cutters
scissors
hot glue gun and glue
I started by taking one end of the garland and securing it with a small piece of floral wire to the back of the wreath.
Continue to wrap the garland around the wreath.
I used the entire length of garland.
Once you get to the end secure the end to the back of the garland with another piece of floral wire.
I made sure to leave a wider space between one section of the garland to place my flowers.
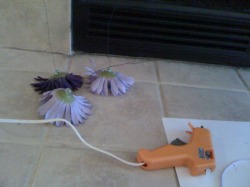
For the flower prep I removed the heads of 3 flowers from the bunches I had purchased.
Cut a length of floral wire (long enough to go through the entire width of the wreath) and twist around what is now left of the stem. Take the hot glue gun and glue this in place. Repeat for all 3 flowers.
Let dry.
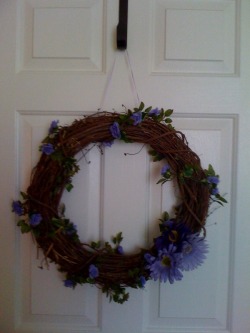
Once the flowers are dry take them one by one and place them onto the wreath by threading the floral wire through the wreath itself to stick out of the back. Do not secure them until you have all 3 placed where you would like.
Once they are placed twist the wire from all 3 together and secure to the back of the wreath.
Cut a length of ribbon (depending on how low you want it to hang) and tie to the back of the wreath.
And done!
18" grapevine wreath
6' garland
3 flower heads
1/8" ribbon
floral wire
wire cutters
scissors
hot glue gun and glue
I started by taking one end of the garland and securing it with a small piece of floral wire to the back of the wreath.
Continue to wrap the garland around the wreath.
I used the entire length of garland.
Once you get to the end secure the end to the back of the garland with another piece of floral wire.
I made sure to leave a wider space between one section of the garland to place my flowers.
For the flower prep I removed the heads of 3 flowers from the bunches I had purchased.
Cut a length of floral wire (long enough to go through the entire width of the wreath) and twist around what is now left of the stem. Take the hot glue gun and glue this in place. Repeat for all 3 flowers.
Let dry.
Once the flowers are dry take them one by one and place them onto the wreath by threading the floral wire through the wreath itself to stick out of the back. Do not secure them until you have all 3 placed where you would like.
Once they are placed twist the wire from all 3 together and secure to the back of the wreath.
Cut a length of ribbon (depending on how low you want it to hang) and tie to the back of the wreath.
And done!